
File Search
This is is where you pull a basic report that can be turned into letters, labels, or a mail-merge, email or Excel file.
The File Search menu, which is growing all the time, consists of several Parameter tabs, a Search tab and an Output tab. Reports included in this module should not be use as substitutes for the more precise reports included in the Accounting or Disclosure Reporting sections of the program. If you're tracking financial transactions, then go to Accounting->Reports and run a Daily Cash Report or Transaction Summary. Parameter Tabs: Main, Main 2, Main 3, Voting, Receipts 1 (pictured here), Receipts2, Expense 1, Expense 2, Worker, Contacts, Lists.

The system selects records that meet ALL of the parameters on the various tabs. For example, if you choose a contribution code of X1 and a list code of X2, only those with contributions code X1 and list code X2 will be chosen. If you're looking for everyone with the X1 contribution code or the X2 list code, then you need to do a combination search.
The only exception to the "AND" rule is multiple code selection within each tab. If you choose several donor codes on Receipts 1, for example, the system will select everyone with any or all of those codes. However, if you choose several donor codes and several accounts, the system will select those with one of the donor codes and one of the accounts. If you wish to select those with all of the selected codes, then check the Match All box. Skip: Means the same as omit. If you want all receipts except X1, then choose X1 and check the Skip box next to it. Exclude: If you check this box, you will exclude from your search anyone with this code. This is useful if you wish to send a letter to all donors except those with the code CC / Chairman's Club.Troubleshooting your report
If you're not getting the output you think you should have, try the following:
1. Consider the Nixie factor. The Skip Nixies and No Mail checkbox on the Search tab is checked by default, which means the report will skip anyone who has moved, died or requested removal from your mailing list. 2. Consider the Records Selected. If you're doing a code search that pulls up 100 codes but presents only 80 people, it means that several of those selected have multiple selected codes under their name. 3. Choose Print/Display to run your search. This enables you to see everyone who was selected, along with their codes. In the Print/Display screen, hit the End key to go to the bottom of the report. The last number represents the number of persons selected. 4. Try again, but with fewer parameters. Close the File Search window (this clears all parameters) and start again. If you're looking for all donors at a particular level in a particular county, forget about the level and the county and first try a search of all donors between certain dates, say from 01/01/2000 to (T)oday. Then run another search for those donors in the desired county or counties. Then run another search for those donors in the same counties, and this time add in the remaining parameters such as contribution level. 5. Run File Reorganization. Go to Tools->File Maintenance->Data File Reorganization. There might be a problem with your data files. This will probably clear it up.SEARCH Tab
Includes a collection of enhancements for and additions to your report.
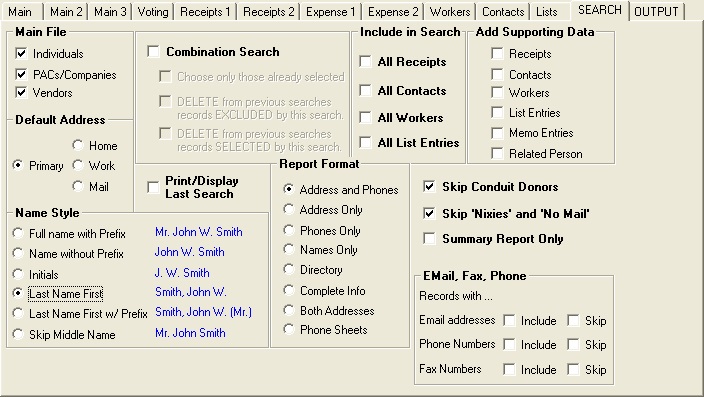
Add supporting data: Enables you to add support code detail to each record selected. For example, if you're generating a list of donors, you can include in the list their worker, contact and list entries.
Combination Search: Retain the contents of the previous search. Use this option when you cannot generate the desired output with just one search. For example, if you're looking for the detail of all donors and all worker entries in a particular county for the current year, you can't really generate it in one search because the system will look for those who have donated this year AND have a worker entry for this year, which probably means leaving out more than a few. By checking the combination search box, you can run the donor search and then the worker search. When you choose a combination search, the No Output box on the Output tab will be checked automatically. Leave this box checked unless this is the last search in your combination sequence, in which case you should choose Print/Display. The top of the printout will list the parameters for each search in your combination. Print/Display Last Search: Ignores all other search parameters and outputs the contents of your previous seach. Skip Conduit Donors: If you're receving earmarked funds from groups like Club for Growth, you've probably been asked to omit their donors from your in-house mailings and contacts. Choosing this option omits all donations from earmarked bundles. This box is checked by default.
Skip "Nixies" and "No Mail": Omits from your search all records with nixie codes (deceased, bad addresses and no mails). You should UNcheck this box only if you're generating a report that A) won't be used for mailing or phoning, and B) needs to match totals with accounting reports for the same period. Otherwise, you should always leave it checked.OUTPUT Tab
Determines the form of your report. Always defaults to Display and Print.
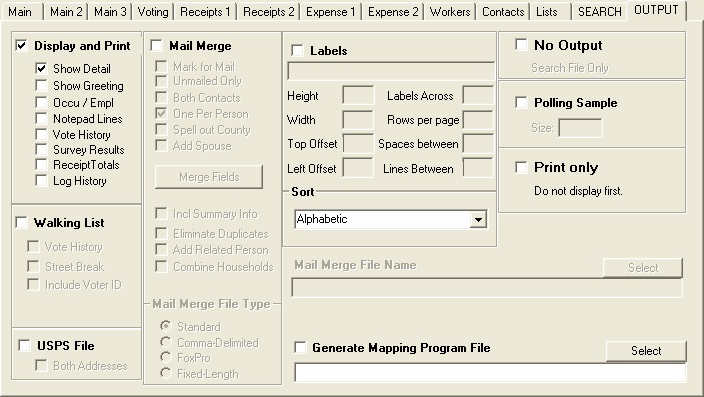
Display and Print: This is the default. Includes checkboxes to add things like notepad comments and personal greeting to the display of selected records. If you choose an output other than this one, you should always Display and Print anyway because it enables you to scroll through your report to ensure that you received the desired output.
Walking List: Generates a street-order list. Obviously this option is chosen for precinct walking lists but campaigns can also use it to generate a street-order list of lawn sign locations. USPS File: Generates a shortened version of the merge file. Primarily intended for generating an output file that is sent for outside processing, such as NCOA correction, address standardization, phone-matching and email-matching. The Filpac system includes a utility to import from this format. The Both Addresses checkbox enables the generation of an additional record if there's a second PAC contact or secondary address. Mail Merge: Goes directly to mail merge, and opens the mail merge parameters that are more fully explained in the Mail Merge section of this manual.Mark for Mail: If you check Mark for Mail, the system will check the donor, contact, worker or list entry as having been mailed. You can see this as an asterisk when you pull up the person's donor, contact, worker or list entry.
Unmarked Only: When you choose this parameter, the system will generate a merge file only for those records that are unmailed, i.e. have not been denoted with a Mark for Mail entry. Labels: Several standard label formats are available. Use the Left Offset and Top Offset variables to line up the labels on the page. No Output: Use this option if you're generating a Combination Search, or if you intend to manually create a mail merge file. Polling Sample: Generates a random sample of your selection and generates the number of records specified by the Size parameter. If you've installed your voter file, use this option to generating the phone list for your pollster. Print only: Choose this option if you're anticipating a large print output and you've received an error message when trying to display a very large report. Generate a Mapping Program File: You can choose this option, in addition to any others, if you'd also like to generate a map of your selection. This is the file that will be saved in Google Docs as part of the map-making process.